Porting C++ projects to SYCL with DPC++ and Visual Studio Code
30 June 2023
During the previous guides in this series, we setup the Visual Studio Code (VSCode) development environment on a Ubuntu 20.04 platform from scratch. The guides in this series are:
- Guide 1(Part 1)- Debugging SYCL™ code with DPC++ and Visual Studio® Code
- Guide 1(Part 2)- Setting up Visual Studio Code on Ubuntu for C++ development
- Guide 1(Part 3)- Setting up SYCL™ development with oneAPI™, DPC++ and Visual Studio® Code on Ubuntu
- Guide 2- Debugging the DPC++ debugger using Visual Studio® Code on Ubuntu
- Guide 3- Porting C++ projects to SYCL with DPC++ and Visual Studio Code
Introduction
Aimed at people not familiar with the VSCode IDE, this article continues to provide a guide to using DPC++ with Visual Stucio Code. It is a quick summary of a few approaches to porting (large) C++ projects to use VSCode’s C/C++ build and configuration systems from a shell-based development environment. This is generally taken to take advantage of the IDE features for rapid code development and debugging. This guide will summarize the steps to take most C++ projects, like those that use CMake or Makefile build configurations and replace them with the build configurations systems provided by the Microsoft C/C++ extensions for VSCode. Using the IDE and its extensions provides several advantages over developing by the command line interface alone. These are:
- All configurations and debug aids, i.e. watch variables and break point locations are persistent between instances of a VStudio Code C/C++ project.
- Use Intellisense to provide quicker code base navigation, reveal implicit code definitions, and use code completion to write code faster.
- Like CMake, access multiple compilation profiles in one project to configure diverse types of program builds. For example, a project can have a debug build, lean release build, or a debug release build.
- Invoke a debug session choosing from a GUI drop list of different debug session types, i.e. a debug or a debug release build.
- Present options to the user as they start the debug session using GUI prompts or lists to feed program’s arguments for rapid variation debugging.
- Step over functions, into functions, step out and up from functions in step with Intellisense while manipulating any number of break points visible in the code (figure 2).
- During a debug session, view the output messages from the debugger or ask the debugger to execute instructions directly for more advance debugging.
- Use either various Microsoft C/C++ extensions’ debug views or additional extensions to view or manipulate program state or the state of tangible resources in real time (figure 1).
This guide is a continuation of Guide 1 part 2 and provides a means to reveal the sometimes implicit compiler flags used to pull in a DPC++ project’s dependencies. These dependencies can be supporting libraries like the oneAPI oneMKL (Maths Kernel Library) or other third-party libraries. The necessary include and library paths can be added to the VSCode project’s build configuration files to enable a successful build.
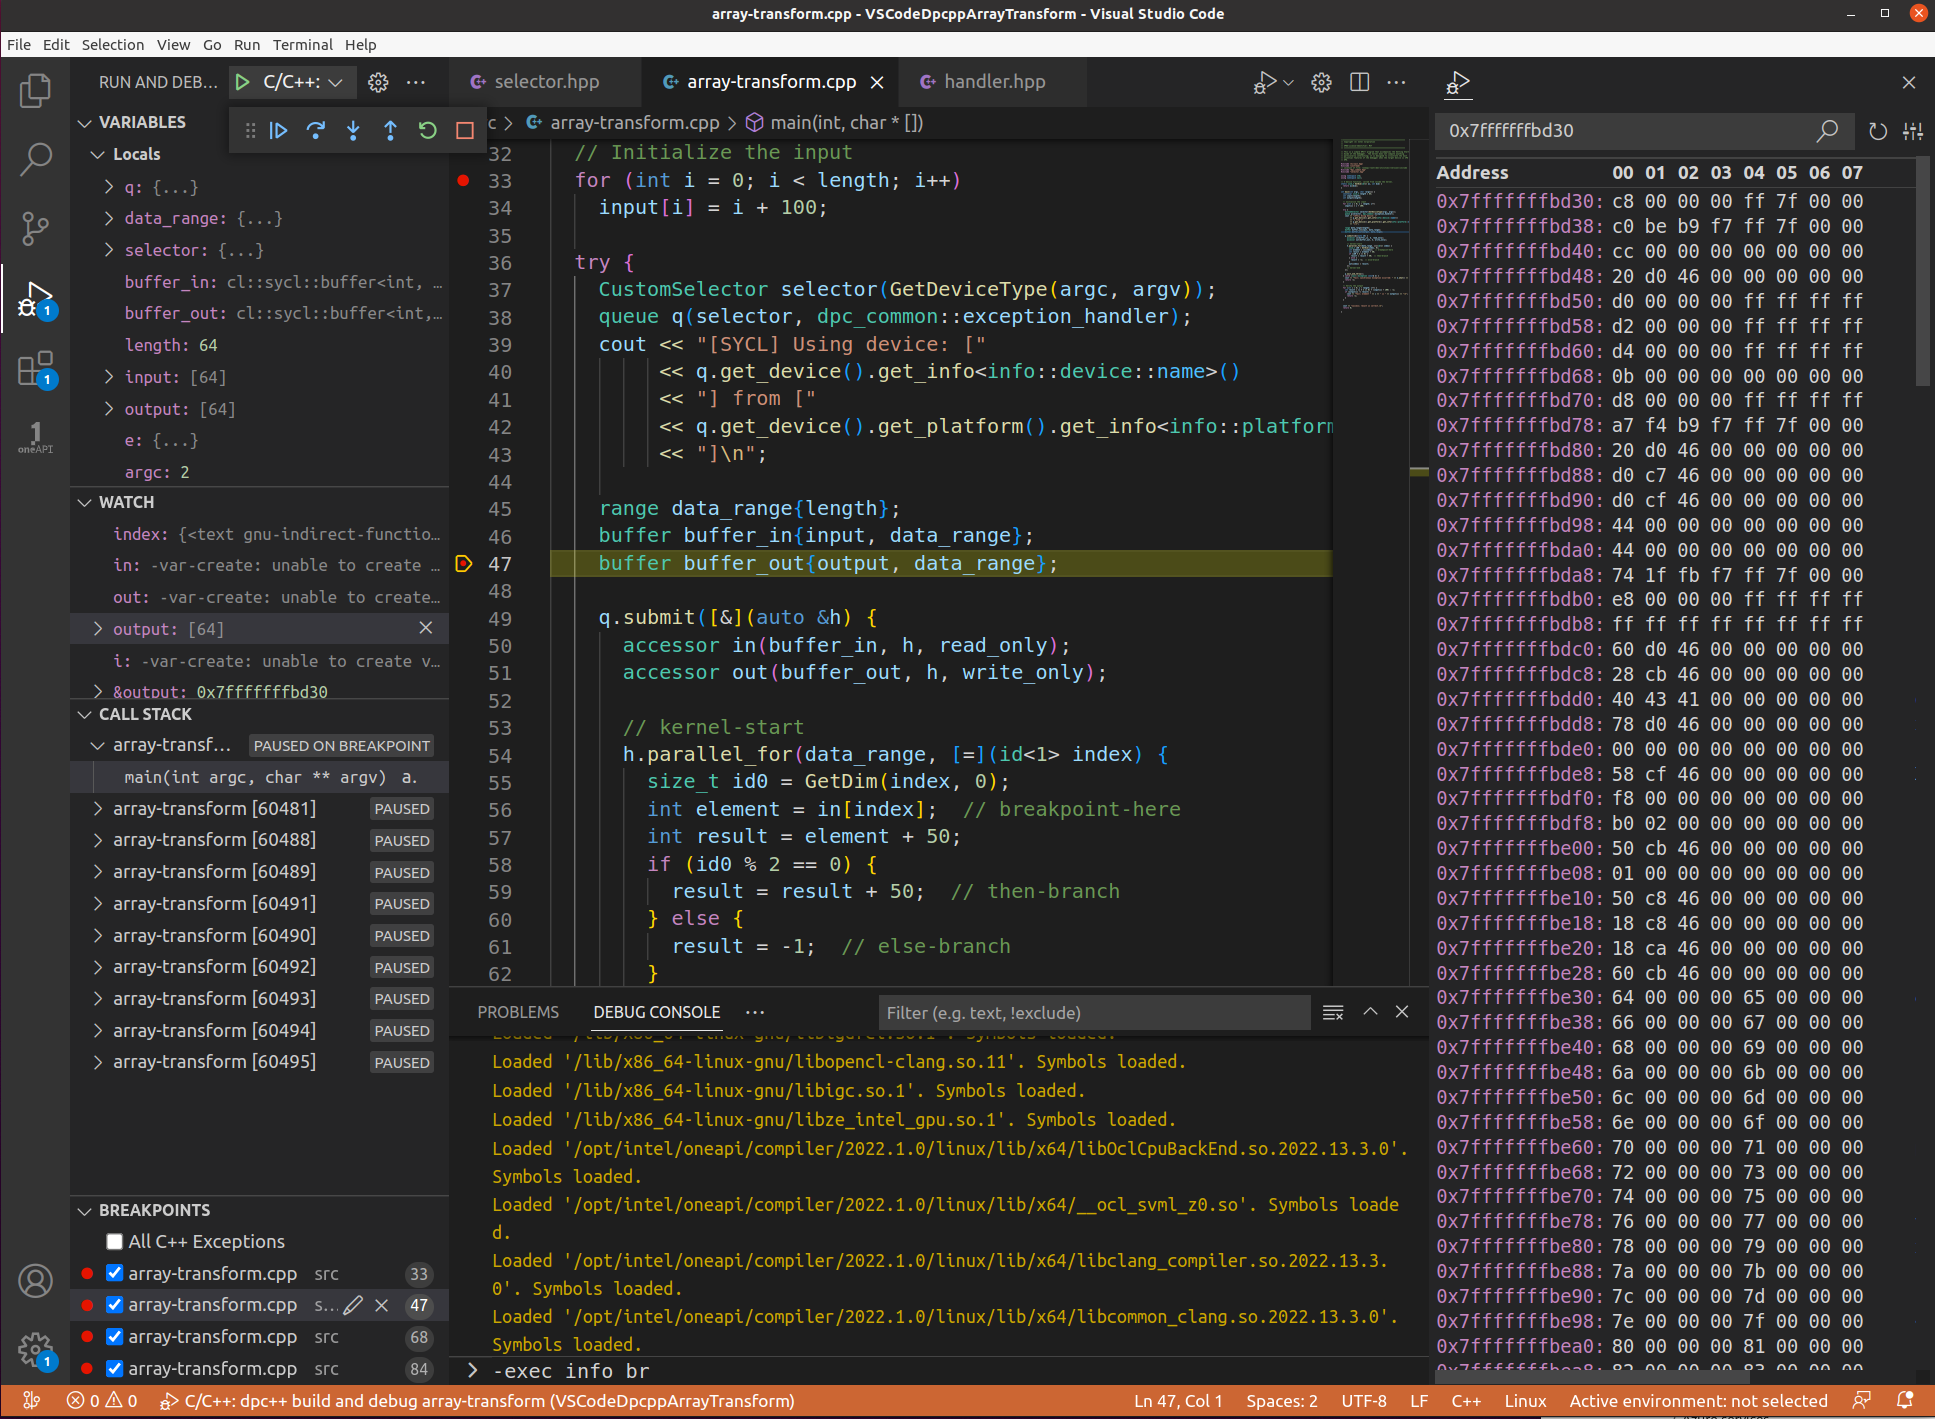 Figure 1: A debug session of DPC++ program.
A fresh installation of VSCode cannot do anything. This is because VSCode does not natively support any build system out of the box. However, VSCode makes extensive use of plugins or ‘extensions’ to provide the functionality you need. To develop C/C++ programs with the advantages listed, the Microsoft’s C/C++ specific extensions are required.
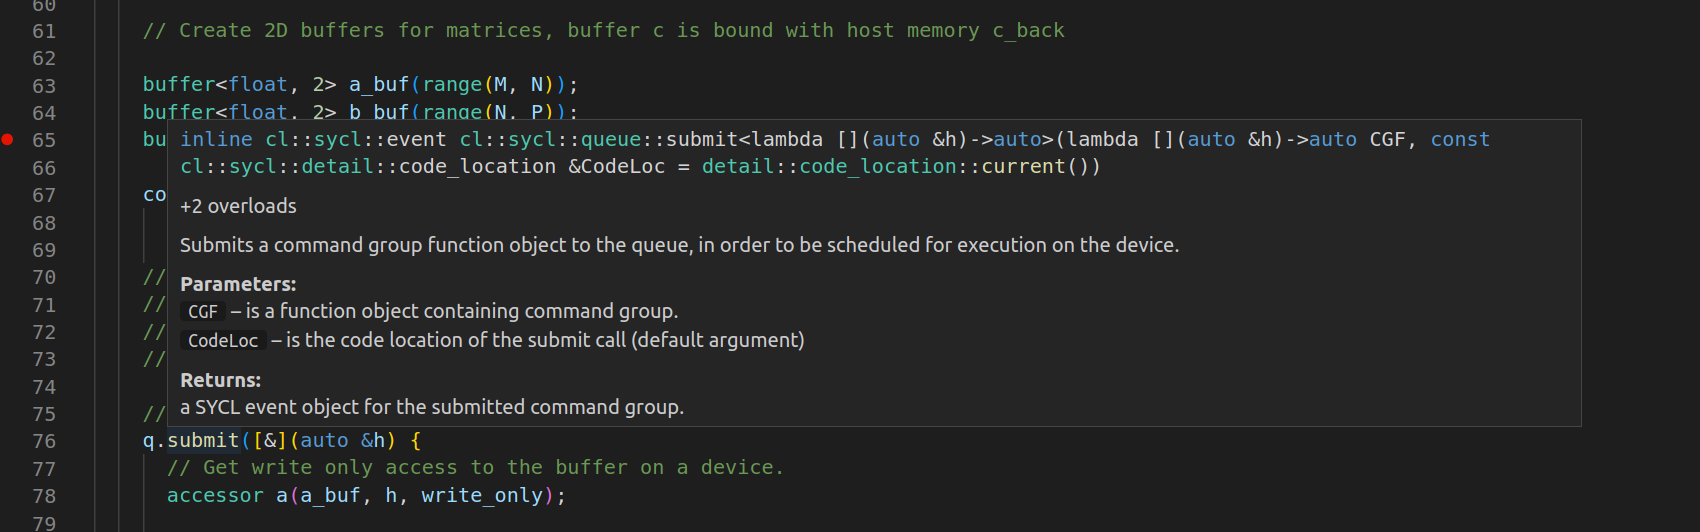 Figure 2: A debug session of a DPC++ program.
The Microsoft C/C++ extensions provide various JSON configuration files which it parses to drive both compilation tasks and launch debug sessions. These configuration files can be edited using various VSCode commands provided by the extensions. The extensions provide ‘helpers’ to create basic configurations for you by searching your platform for available compilers or debuggers. In most cases, this will enable a standard single-source C++ file program like HelloWorld to be built and debugged. However, these configurations will need to be edited to fit the file structure of any ported projects, or to use non-standard compilers or debuggers like the Data Parallel C++ (DPC++) compiler and gdb-oneapi respectfully. The good news is a lot the information you need can come from the existing build systems configuration scripts, i.e. The Makefile or CMake files of the project being ported, as most of the time, the same compiler(s) and debug targets will be used.
To start
To start, open the application in VSCode and go to the Extensions view. Type in the extension’s search box Microsoft C/C++ extensions….. As you type, extensions start to appear. Choose the Microsoft C/C++ Extension Pack.
Introduction to VSCode’s configuration files
The basic set of the Microsoft’s C/C++ extension’s configuration files are listed in table 1.
| Configuration file | Description |
|---|---|
| tasks.json | Holds one or more build configurations. Each holds build instructions for a type of executable to be built. A specific compiler can be specified for each. |
| launch.json | Holds one or more debug configurations, each holds settings on how a specific executable will be debugged. |
| c_cpp_properties.json | Holds the compiler(s) path, program includes and definitions for Intellisense. |
Table 1: The C/C++ extension configuration and settings files for a project.
Every project has a .vscode folder directly under the project folder or VSCode’s Folder in VSCode’s vocabulary. This folder may be a hidden. All the files listed in table 1 can be found in the .vscode folder.
Depending on your needs, additional configuration files can be added to a project to provide more automation or convenience for a project that has many more path and file dependencies. One example is the optional configuration file compile_commands.json mentioned later in this guide.
The c_cpp_properties.json file configures Intellisense to direct it to the necessary include paths and definitions. On setting up a new project where Intellisense is not configured appropriately, Intellisense will flag up unknowns as shown in figure 3.
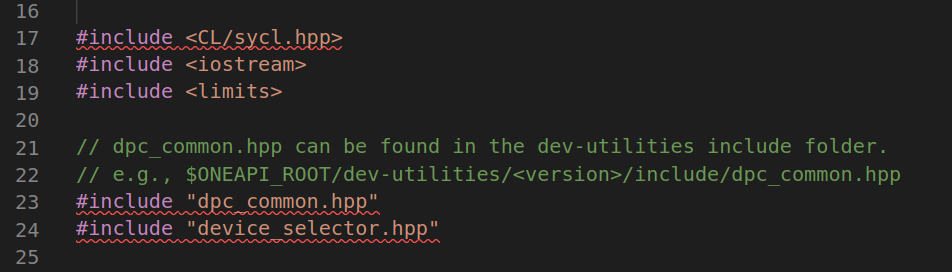 Figure 3: Intellisense not recognising particular includes noted by squiggle underlining.
Approaches to porting a project
A few approaches to porting an existing project to use the Microsoft C/C++ extensions are:
- Create a project and configure manually.
- Copy an existing Microsoft C/C++ extension project’s configuration file to a new project folder and edit to fit the new project.
- Using the Bear tool on an existing build configuration to create a compilation database which can be added to a project.
1. Manually from scratch
The following is a summary of the steps required to create a simple standard Microsoft C/C++ extension project with the gcc compiler and debugger. The extension is already aware of the gcc compiler on the platform and how to use it because it comes as default, and so can configure for it. However, it is not aware of the Intel compiler and debugger and so the configurations files need to be told where to find them. Since the Intel DPC++ compiler and debugger are gcc compatible, most of the options a configuration tool defines are the same for both.
The following steps creates a standard C++ project:
- Create a top project folder with the name of the project.
- Copy the directory structure of the existing project or define a new file structure.
- Copy the code files to the appropriate folders.
- In a terminal window, to run the VSCode application, type
code .in the top folder of the project. - Generate a build task: In VSCode, in the Explorer pane, choose the main .cpp file of the project. Choose the VSCode command palette by ctrl+shift+p, type C/C++:, choose Select a configuration, next choose your compiler.
- To match the project’s code file structure, open the new build tasks.json file and edit the arguments to the compiler to include:
"-I${workspaceFolder}/include","${workspaceFolder}/src/*.cpp",
- To verify the build task is configured correctly, open the IDE’s debug terminal pane to see how the compiler is progressing once started.
- To build the project, use the command palette (ctrl+shift+p), and choose a build configuration, for example, a debug build.
- Fix any compile errors or continue to the next steps.
- To generate an Intellisense configuration file:
- In the Explorer pane unselect any files
- Hit ctrl+shift+p, type C/C++:, choose Edit configuration (UI).
- To generate a debug session launch.json file: In VSCode, in the Explorer pane, choose the main .cpp file, hit ctrl+shift+p, type C/C++:, choose Add debug configuration, choose your debugger of choice.
- To start a debug session, in the Explorer pane choose the main .cpp file, hit ctrl+shift+alt+d, choose the type of debug session to execute if more than one is available.
- Now in the debug mode, place a break point at the selected code line after main by typing F9.
- Hit F5 to start program execution.
- The program should build and execute, stopping at the break point.
To convert the a C++ project to compile and debug a DPC++ program, edit the basic configuration files listed in table 1 and replace the gcc compiler and debugger with the paths to the DPC++ compiler and debugger.
"setupCommands": [
{
"description": "Intel gdb-oneapi disable target async",
"text": "set target-async off",
"ignoreFailures": true
} ]
2. Copy an existing project’s configurations
Once one DPC++ project is up and running with the required compiler configurations and desired debugging scenarios, it is very quick and easy to create new DPC++ projects using a previous DPC++ project as a template. The steps are:
- Create a top project folder with the name of the project.
- Copy an existing file structure or define a new one under the top project folder.
- Copy the .vscode folder and its contents from the ‘template’ project which most closely matches your desired build and debug configurations and put it in the top project folder.
- Edit each of the configuration files in the .vscode folder to fit with the new project’s file structure, project name, desired build, and debug configurations.
- Open the VSCode IDE and choose Open Folder… from the GUI and choose the project folder.
- The new project should now be able to use its configurations to build and debug the code within.
3. Use Bear to assist in the discover and creation of compiler paths and commands
In addition to using one of the two previous approaches for porting a project, the Bear tool can be used to assist in revealing a project’s compiler path dependencies or reveal the (sometimes implicit) compiler configurations. The Bear tool can discover the configuration used for a specific build.
The Bear tool command, available on the Ubuntu OS, is a tool to generate a compilation database (figure 4). The JSON compilation database contains information on how a single compilation unit was processed. While its primary use is to use the discovered information to re-run the same compilation configuration with different programs, the same information can be used to help define configurations for the new project. It can be used to add additional search paths the project’s No suggestions, which in turn directs Intellisense to be made aware of the additional files and definitions.
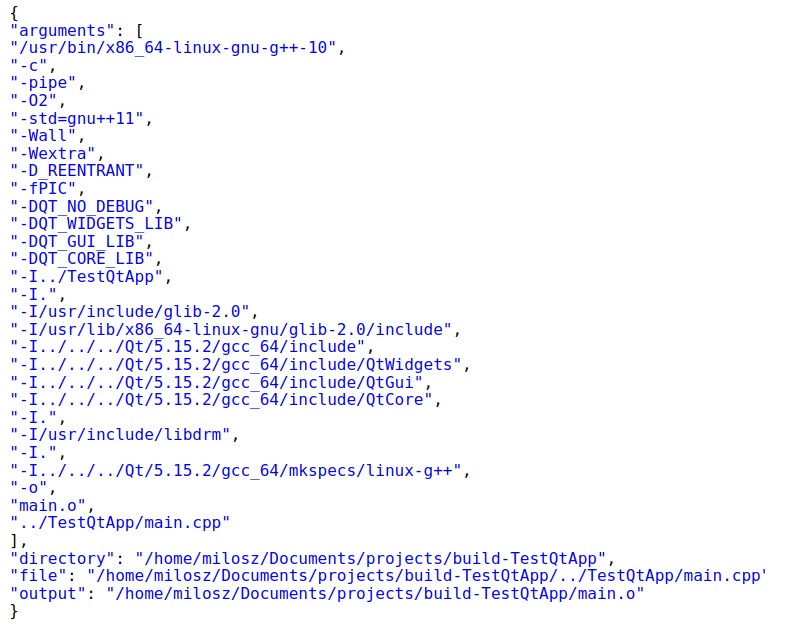
Figure 4: Example compile_commands.json file generated by Bear on a QT project’s qmake build system.
For information on how populate the c_pp_properties.json file see https://code.visualstudio.com/docs/cpp/customize-default-settings-cpp.
To use the Bear tool:
- In a terminal window move to the folder of project that can execute that project’s make command.
- Type in the terminal
Bear – <the make command>. - Extract the necessary option, paths, arguments to help configure the new project.
The Microsoft C/C++ extension can reference a compilation database file directly which removes the need to put all the options in the c_cpp_properties.json file.
 Figure 5: Example of a existing DPC++ project’s CMakefile build configuration run through the Bear tool to generate a compilation database.
To direct a Microsoft C/C++ extension project to use a compilation database, use the command palette and type C/C++: Edit configuration (UI) and scroll to the Advanced section. In the Advanced section look for the option Compile Commands. There, enter the full path and name of the database file.
Conclusion
Of the three approaches presented, the approach which copies the configuration files from another working project is by far the easiest and quickess taking only a few minutes.
The Bear tool can be a valuable aid to deconstructing a complex project build to provide hints to perhaps implicit compiler options and include paths.
Next steps
Guide 4 in this series will use the steps in this guide to create a DPC++ VSCode project to link in one of oneAPI’s many utility libraries, the oneMKL maths library.

Illya Rudkin
Principal Software Engineer
In This Series
This article is part of a series, please use links below to jump to different parts.
-
Guide 1Part 1Debugging SYCL™ code with DPC++ and Visual Studio® Code
-
Guide 1Part 2Setting up Visual Studio Code on Ubuntu for C++ development
-
Guide 1Part 3Setting up SYCL™ development with oneAPI™, DPC++ and Visual Studio® Code on Ubuntu
-
Guide 2Debugging the DPC++ debugger using Visual Studio® Code on Ubuntu
-
Guide 3Porting C++ projects to SYCL with DPC++ and Visual Studio Code
-
Guide 4Linking oneAPI libraries to a Visual Studio Code C++ Project