Introducing the oneAPI Construction Kit
05 June 2023
oneAPI is an open, cross-architecture programming model allowing developers to use a single codebase across multiple accelerator architectures such as GPUs and FPGAs. oneAPI uses SYCL™ at its core and this is used to implement a set of libraries including math and AI using the DPC++/C++ Compiler. DPC++ is a LLVM-based compiler project that implements compiler and runtime support for the SYCL language.
With the oneAPI Construction Kit it is now possible to bring the components of oneAPI, in particular the DPC++ compiler, to new accelerator processor architectures.
The purpose of this post is to demonstrate how it is possible to enable DPC++ to compile SYCL code for a reference accelerator architecture based on RISC-V® using the oneAPI Construction Kit. By the end of this post, I will have shown a working SYCL program running on a computer’s CPU combined with a RISC-V simulator.
This post will not cover all the code that would need to be updated for a new device, but instead focus on the key component parts so that you can try this out yourself. For your own accelerator processor, you’ll want to make a few changes specific for your design, which the documentation describes and which we’ll work through in future blog posts.
Background to offloading and the oneAPI Construction Kit
The diagram below shows how a host device works with an accelerator:
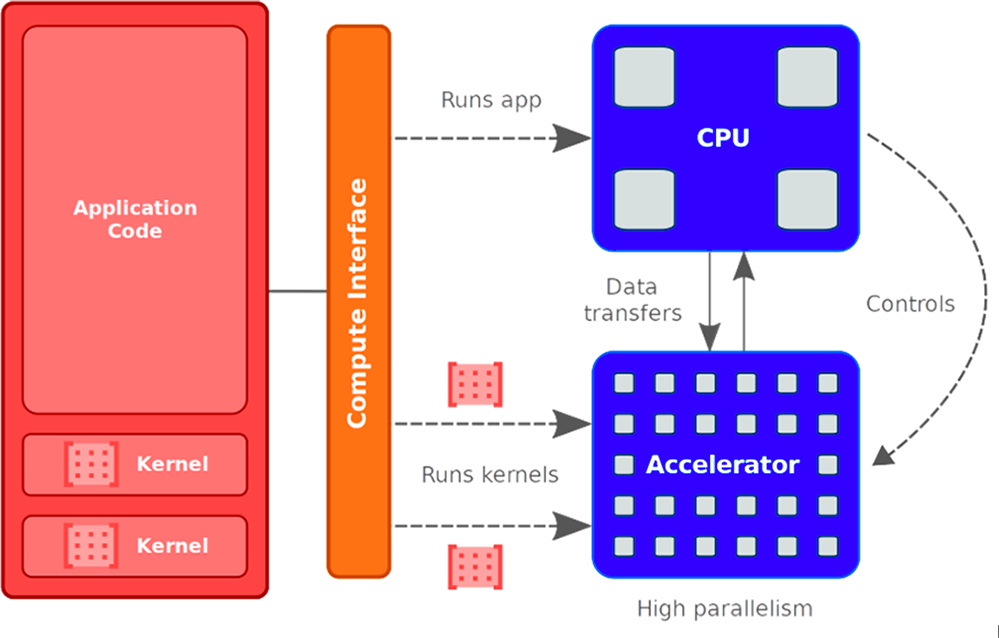
The CPU cores run the bulk of user application code and manage work done by the accelerator. Accelerator cores run small, dedicated parts of the program – called ‘kernels’. Accelerator cores idle until given kernels to run by the CPU. The CPU can perform other work while waiting for accelerator to finish executing kernel(s). With respect to the Refsi G1 example used during this post, the CPU will be x86, and the RISC-V cores will be simulated via a simulator library.
Prerequisites
During this walk through I will be using Ubuntu 22, but the basic steps should also work on Ubuntu 20, which is our normal supported platform. Ubuntu22 was chosen to allow us to use the latest llvm binary releases.
First create a new directory and clone the oneAPI Construction Kit inside it.
mkdir oneapiconstructionkit
cd oneapiconstructionkit
git clone https://github.com/codeplaysoftware/oneapi-construction-kit.git
This command line assumes you have set up a github account and added your public ssh key.
The Docker can be built using the following steps:
cp oneapi-construction-kit/examples/technical_blogs/refsi_simple_blog1/* .
sudo docker build -t refsi_blog .
The Docker set up assumes that everything will be placed under /home/demo and sets an environment variable $BLOG_TOP_LEVEL to be this value, amongst other variables which will be explained through the blog post.
I can now run the Docker container with:
sudo docker run -it --rm refsi_blog bash The Docker pre-installs the following packages.
$ sudo apt update
$ sudo apt install -y build-essential git cmake libtinfo-dev python3
$ sudo apt install -y ninja-build doxygen python3-pip
$ sudo apt install -y wget spirv-tools libzstd-dev libtinfo5
$ sudo pip install lit virtualenv cmakelint cookiecutter
For the reference implementation, I have developed support for the RISC-V target through the LLVM compiler project. For most custom targets this will require building LLVM, but for the purposes of this blog I will download a prebuilt version from the LLVM github site:
wget https://github.com/llvm/llvm-project/releases/download/llvmorg-16.0.4/clang+llvm-16.0.4-x86_64-linux-gnu-ubuntu-22.04.tar.xz
tar xf clang+llvm-16.0.4-x86_64-linux-gnu-ubuntu-22.04.tar.xz
The next step is to download the Intel® oneAPI DPC++/C++ Compiler and Runtime that will be used to compile the SYCL code for the RISC-V target. To obtain the pre-released DPC++ compiler, please visit the following link: https://github.com/intel/llvm/releases . It recommended to download the DPC++ daily version released on May 18, 2023 since this is the one I have used, which can be found at: https://github.com/intel/llvm/releases/tag/sycl-nightly%2F20230518
wget https://github.com/intel/llvm/releases/download/sycl-nightly%2F20230518/dpcpp-compiler.tar.gz
tar xf dpcpp-compiler.tar.gz
I will also clone the oneAPI-Samples from the oneAPI GitHub repo, I will compile and run one of these samples.
git clone https://github.com/oneapi-src/oneAPI-samples.git Custom Targets
In this part I will explain what a custom target is and create one that will work with our internal reference RISC-V device, the Refsi G1, a RISC-V device with two cores.
The following diagram shows how the oneAPI Construction Kit currently makes it possible to add new devices so that they can make use of the DPC++ SYCL compiler.
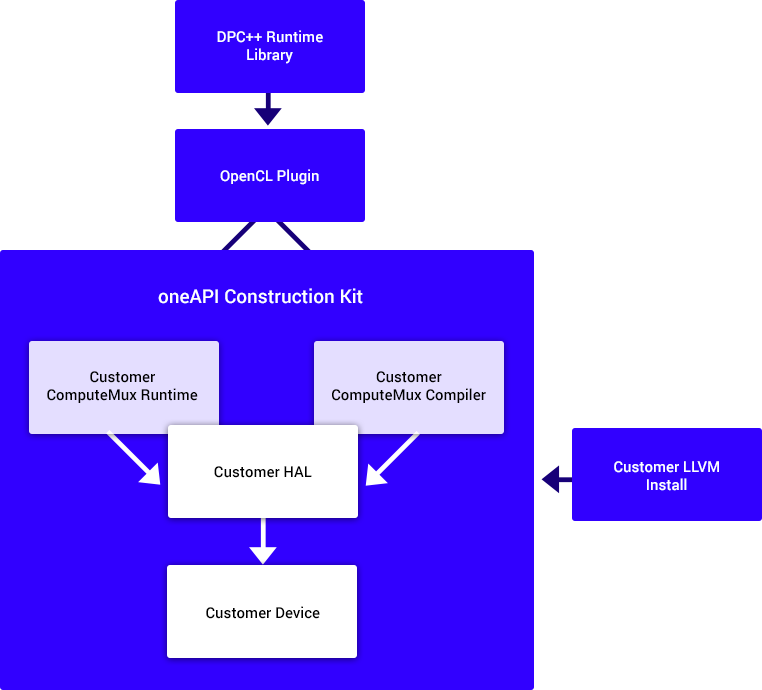
The DPC++ runtime allows OpenCL to be used as a plugin. The oneAPI ConstructionKit supports this interface and provides runtime and compiler modules. The compiler interface will use a custom LLVM install (or in the case of this post a standard RISC-V supporting one)
A custom target is made up of three key parts:
- Runtime code (what I call the ComputeMux Runtime)
- Compiler code (what I call the ComputeMux Compiler)
- An Optional HAL (Hardware Abstraction Layer) which gives static information and simplified runtime interfaces to a device to make getting started easier.
The runtime code will run on the host device (i.e. the machine I am running on and more often than not the CPU) and will interface with the target device - the accelerator which in this case is a RISC-V simulator. It will handle aspects such as allocation of and reading/writing memory, queuing of commands and executing kernels on the device. The compiler code is typically based on a number of LLVM passes that will turn the original kernels into something matching the interfaces required to run a kernel on the device.
To create a new custom related target there is a script to help get started. This generates basic but functional generic template code that a developer can customize to their needs. The script is called create_target.py and can be found in the scripts folder at the top level. It assumes that I am using the optional HAL component. To create a new target I just need to supply it with a json file including details such as:
"target_name": "refsi_tutorial",
"llvm_name": "RISCV",
"llvm_cpu": "\"generic-rv64\"",
"llvm_features": "'+m,+f,+a,+d,+c,+v,+zbc,+zvl128b'",
This is used as input to the creation of the files needed to create a custom target, both runtime (ComputeMux Runtime) and compiler (ComputeMux Compute). For example, the “llvm_features” option enables various backend features for the RISC-V backend.
To run the script, call the following inside the oneAPI Construction Kit top level directory:
./scripts/create_target.py $PWD scripts/new_target_templates/refsi_g1.json --external-dir $BLOG_TOP_LEVEL/refsi_blog At this point you will have 2 directories called “mux” and “compiler”. There will also be a CMakeLists.txt under $BLOG_TOP_LEVEL/refsi_blog. The mux directory relates to all the runtime code, and the compiler directory relates to all the compiler related code.
Since I am using Refsi G1, I can use a HAL directly from the Construction Kit’s example HALs. The HAL contains low level access methods such as allocating and reading and writing to memory and executing kernels. In a future post I will show you how to create your own HAL. Both the mux and compiler generated code will interact with the HAL, but mux interacts it with it in a more dynamic way, whereas the compiler will access static information.
For the purposes of the rest of this post I assume that the following environment variables are set up:
|
ONEAPI_CON_KIT_DIR |
Base of construction kit |
|
DPCPP_DIR |
Path to DPC++ compiler top level |
|
ONEAPI_SAMPLES_DIR |
Path to oneAPI-samples |
|
LD_LIBRARY_PATH |
Must include $DPCPP_DIR/lib from the DPC++ installation |
|
LLVM_INSTALL_DIR |
Path to the LLVM install |
To build the toolkit for the new target I need the following CMake line inside $BLOG_TOP_LEVEL/refsi_blog:
cmake -Bbuild \
 -DCA_EXTERNAL_ONEAPI_CON_KIT_DIR=$ONEAPI_CON_KIT_DIR \
 -DCA_EXTERNAL_REFSI_G1_HAL_DIR=$ONEAPI_CON_KIT_DIR/examples/refsi/hal_refsi \
 -DCA_MUX_TARGETS_TO_ENABLE="refsi_g1" \
 -DCA_REFSI_G1_ENABLED=ON \
 -DCA_ENABLE_API=cl \
 -DCA_LLVM_INSTALL_DIR=$LLVM_INSTALL_DIR \
 -DCA_CL_ENABLE_OFFLINE_KERNEL_TESTS=OFF \
 -GNinja
The relevant CMake variables here are:
|
CA_EXTERNAL_ONEAPI_CON_KIT_DIR |
Path to the main construction kit |
|
CA_EXTERNAL_REFSI_G1_HAL_DIR |
Path to the HAL that is associated with device, in this case the one suitable for RefSi is contained withing the oneAPI construction kit |
|
CA_MUX_TARGETS_TO_ENABLE |
Targets to enable – in this case I only want “refsi_g1” |
|
CA_REFSI_G1_ENABLED |
To enable building of this target |
|
CA_LLVM_INSTALL_DIR |
Path to llvm install |
|
CA_ENABLE_API |
Which APIs to enable. In this case I only want OpenCL. |
I can then build a working Refsi target. I can just call ninja to build everything.
cd build
ninja
I can then run a simple test. I will run a single test from our OpenCL test suite, UnitCL, to check the OpenCL target is working. This requires an additional environment variable (OCL_ICD_FILENAMES) which can be used to tell the OpenCL ICD Loader where to look for the OpenCL library.
OCL_ICD_FILENAMES=$BLOG_TOP_LEVEL/refsi_blog/build/oneAPIConstructionKit/lib/libCL.so
./OneAPIConstructionKit/bin/UnitCL --gtest_filter=Execution/Execution.Task_01_02_Add/OpenCLC
This runs a simple add kernel and should show at the end:
 [ RUN ] Execution/Execution.Task_01_02_Add/OpenCLC
 [ OK ] Execution/Execution.Task_01_02_Add/OpenCLC (43 ms)
 [----------] 1 test from Execution/Execution (43 ms total)
 [----------] Global test environment tear-down
 [==========] 1 test from 1 test suite ran. (46 ms total)
 [  PASSED  ] 1 test.
This test takes creates two input buffers, which are allocated in Refsi’s device memory. It then executes a kernel on the device in parallel which adds the contents of the two buffers together and writes the result to an output buffer.
I now want to build a SYCL program and use it on our device. I will use a simple SYCL example which adds the contents of two buffers containing integer values. The main part looks like:
 q.submit([&](handler &h) {
   // Create an accessor for each buffer with access permission: read, write or
   // read/write. The accessor is a mean to access the memory in the buffer.
   accessor a(a_buf, h, read_only);
   accessor b(b_buf, h, read_only);

   // The sum_accessor is used to store (with write permission) the sum data.
   accessor sum(sum_buf, h, write_only, no_init);

   // Use parallel_for to run vector addition in parallel on device. This
   // executes the kernel.
   //    1st parameter is the number of work items.
   //    2nd parameter is the kernel, a lambda that specifies what to do per
   //    work item. The parameter of the lambda is the work item id.
   // SYCL supports unnamed lambda kernel by default.
   h.parallel_for(num_items, [=](auto i) { sum[i] = a[i] + b[i]; });
 });
This submits to a queue a small sum kernel which is run in parallel in the Refsi G1 device. The most important part is “{ sum[i] = a[i] + b[i]; }” – which shows the basic kernel being run on the device in parallel.
First of all, I want to build the SYCL executable using clang++ from the downloaded DPC++. The source code is in the oneAPI samples repo I cloned earlier and is built as follows:
$ DPCPP_DIR /bin/clang++ -fsycl
$ONEAPI_SAMPLES_DIR/DirectProgramming/C++SYCL/DenseLinearAlgebra/vector-add/src/vector-add-buffers.cpp -o simple_add
This will build something I can directly execute, but which offloads onto the Refsi G1 accelerator.
To run this I need an additional environment variable (ONEAPI_DEVICE_SELECTOR) to tell DPC++ that it should select the OpenCL accelerator using the OpenCL accelerator plugin. First of all I want to check that SYCL can see the accelerator, so I use the sycl-ls. This will list the devices the DPC++ compiler can currently detect.
OCL_ICD_FILENAMES=$BLOG_TOP_LEVEL/refsi_blog/build/OneAPIConstructionKit/lib/libCL.so
$ DPCPP_DIR/bin/sycl-ls
This should show something like this on our Refsi G1 accelerator
[opencl:acc:0] ComputeAorta, RefSi G1 RV64 OpenCL 3.0 ComputeAorta 2.0.0 LLVM 15.0.0 [2.0]OCL_ICD_FILENAMES==$BLOG_TOP_LEVEL/refsi_blog/build/OneAPIConstructionKit/lib/libCL.so
ONEAPI_DEVICE_SELECTOR=opencl:0 ./simple_addThis should show:
Running on device: RefSi G1 RV64
Vector size: 10000
[0]: 0 + 0 = 0
[1]: 1 + 1 = 2
[2]: 2 + 2 = 4
...
[9999]: 9999 + 9999 = 19998
To demonstrate that it is actually running on the simulator I have added some debug output when I pass CA_HAL_DEBUG=1
CA_HAL_DEBUG=1
OCL_ICD_FILENAMES=$BLOG_TOP_LEVEL/refsi_blog/build/OneAPIConstructionKit/lib/libCL.so
ONEAPI_DEVICE_SELECTOR=opencl:0 ./simple_add
This should show the HAL functions which are being executed such as:
refsi_hal_device::mem_alloc(size=16, align=128) -> 0x9ff0ff80
refsi_hal_device::mem_write(dst=0x9ff0ff80, size=16)
This shows the sort of things that need to be written to get up and running quickly to interface with your device, showing such things as memory allocations, writing to device memory and executing kernels.
Additionally you can show the RISC-V instructions being run in debug mode using SPIKE_SIM_DEBUG=1 (just press return multiple times, or ‘r’ to continue):
SPIKE_SIM_DEBUG=1
OCL_ICD_FILENAMES=$BLOG_TOP_LEVEL/refsi_blog/build/OneAPIConstructionKit/lib/libCL.so
ONEAPI_DEVICE_SELECTOR=opencl:0 ./simple_add
This should show output such as:
core   0: 0x0000000000001000 (0x00000093) li      ra, 0
core   1: 0x0000000000001000 (0x00000093) li      ra, 0
core   0: 0x0000000000001004 (0x00000113) li      sp, 0
core   1: 0x0000000000001004 (0x00000113) li      sp, 0
Conclusion
In this blog I have created from scratch a oneAPI enabled driver which is capable of running OpenCL and SYCL via the oneAPI SYCL compiler on a reference simulator Refsi G1. This has shown how I can use a script to create a runtime and compiler interface that can be used to connect to our driver. I have also touched on a simple to use HAL interface which can be used to quickly get up and running the main interface to the driver.
In future blogs I will go into more details on how to build your own HAL and how the generated code works.
The oneAPI Construction Kit is open source and is available for free here. Codeplay has also created documentation to support and guide you through setup and usage, which you can access here.
To learn more about the oneAPI Construction Kit, read the Press Release by our CEO and Co-Founder, Andrew Richards.
Intel technologies may require enabled hardware, software or service activation.
No product or component can be absolutely secure.
Your costs and results may vary.
© Codeplay Software Ltd. Intel, the Intel logo, Codeplay and Codeplay logo, and other Intel marks are trademarks of
Intel Corporation or its subsidiaries. Other names and brands may be claimed as the property of others. SYCL is a
registered trademark of the Khronos Group, Inc. RISC-V is a registered trademark of RISC-V International.