Ray-tracing in a Weekend with SYCL: Basic sphere tracing
19 May 2020
Introduction
C++ Ray-Tracing in a Weekend by Peter Shirley is a great resource to start learning about ray-tracers and how to implement one, and at the same time providing all the source code in a GitHub repository . You can find more information about his books on ray-tracing techniques with accompanying implementations on his blog, and you can also download the books as .pdf, or load them on your Kindle device for free from the GitHub project.
The main goal of this blog post is not to teach the concepts of ray-tracing, Peter does a great job of that, but provide a walk-through tutorial on how to accelerate practical applications and algorithms using SYCL.
During this tutorial I used ComputeCpp, Codeplay's implementation of SYCL, and for a reference, here are the relevant hardware and software the machine I've used during development.
CPU: Intel Core i7-6700K
GPU: Intel HD Graphics 530
Operating System: Ubuntu 18.04 - x86_64
The CPU will be our host device that will carry out the required API calls to the SYCL runtime library for memory copy, command group submission and kernel execution.
The GPU will be the SYCL device on which the SYCL kernels will execute the data-parallel computation.
I would recommend having the original C++ code of the "Ray-Tracing in a Weekend" project on your machine. This makes it possible to reference what changes need to be made during the process of using SYCL to parallelize the code.
For SYCL development, ComputeCpp (Codeplay's SYCL implementation) was used and can be downloaded from the Codeplay developer website with support for both Windows and Linux environments.
ComputeCpp is SYCL 1.2.1 conformant with support for not only C++11 but a wide range of the C++14 language feature set. This allows developers to leverage the use of generic lambdas, constexpr evaluations and have guaranteed performance by default. Other SYCL implementations may only support C++11 since this is the minimum required for the SYCL 1.2.1 specification. So whenever a C++14 feature is referred to in this article, a C++11 alternative will also be presented.
Profiling the Raytracing Application
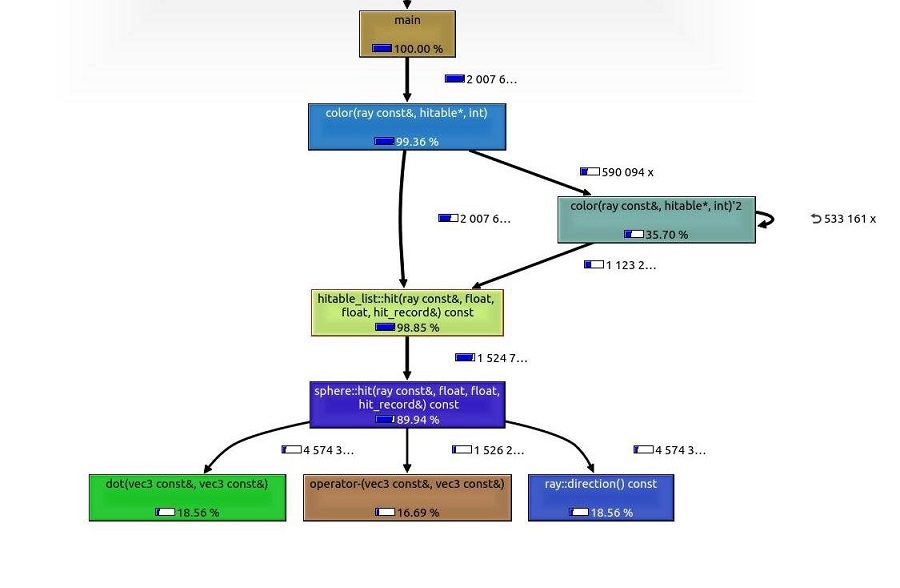
The first thing to do before blindly starting to introduce parallelism, although it might seem obvious where we should start, we will run a profiler on the binary produced from the compilation of the original sequential code to identify the hot paths of the application, and see where is crucial for optimization. The diagram on the right illustrates the output from the profiler.
From the diagram on the right we can see that the most time is spent in the color() function therefore we will parallelize the computation carried out by that function. Effectively, the nested for loops where color is being called per pixel is where the bulk of the computations actually happen. In our SYCL application, this will be the render kernel that will call the color() function that encapsulates the ray-tracing logic.
As we can see color is an indirection to the actual ray-tracing logic which is actually inside the hit() function, that performs a ray-geometry intersection to determine the final color for a point in the geometry. Roughly 90% of the application run-time is taken by a sphere::hit.
Additionally, we have to take care of the recursion inside color since this is a sub-optimal on GPUs and other heterogeneous devices and is also restricted in OpenCL, which is the standard backend of a SYCL implementation, meaning we will have to work around this part.
Here is how it will work in very minimal pseudo-code.
render_kernel (index2D i, spheres[] world):
  out[i] = color (world)
main:
  parallel_for (render_kernel, range2D(image.width, image.height))
range2D defines the kernel iteration space and will execute the render_kernel for both x and y coordinates of the image, similarly to the original two sequential nested for loops, but this will happen in parallel on the selected SYCL device.
for x in image.width:
  for y in image.height:
    out[x][y] = color (world)
  endfor
endfor
The parallel render - host setup
Before beginning with the SYCL code to draw pixels on our screen, let's define the basic structure of the SYCL kernel functor as C++ class. This will contain the ray-tracing computation logic.
This is just a high-level interface of the rendering SYCL kernel functor. Each stage of the development will introduce changes to the structure, new accessor objects and member functions to produce the final scene from the Ray-Tracing in a Weekend book.
The total number of elements or work-items to be computed equals the product of the frame buffer (image) dimensions: width * height. However in SYCL, similar to other compute APIs, we group these elements in what is called work-groups. The size of a work-group is determined by what is most optimal for the kernel and also the device it is running on.
In our case, we are working with a 2D kernel, which means the work-group (or local) range, will be {8, 8}.
namespace constants {
  static constexpr auto TileX = 8;
  static constexpr auto TileY = 8;
}
It is advisable to tweak the work group sizes https://www.codeplay.com/portal/01-09-20-sycl-performance-post-choosing-a-good-work-group-size-for-sycl for your specific hardware to achieve the best performance.
We can abstract the execution of the render kernel in a function that will take care of allocating memory on the device, setting up the kernel index space, and running the kernel in parallel via parallel_for. A general structure of how this would look can be seen below.
template <int width, int height>
void render(sycl::queue& queue, vec3* fb_data) {
  constexpr auto num_pixels = width * height;

  auto frame_buf = sycl::buffer<vec3, 1>(fb_data, sycl::range<1>(num_pixels));

  // submit command group on device
  queue.submit([&](sycl::handler& cgh) {
    // get memory access
    auto frame_ptr = frame_buf.get_access<sycl::access::mode::write>(cgh);
    // setup kernel index space
    const auto global = sycl::range<2>(width, height);
    const auto local = sycl::range<2>(constants::TileX, constants::TileY);
    const auto index_space = sycl::nd_range<2>(global, local);
    // construct kernel functor
    auto render_k = render_kernel<width, height>(frame_ptr);
    // execute kernel
    cgh.parallel_for(index_space, render_k);
  });
The parallel render_kernel class
The render_kernel class will be used as a function object with a private function color that computes the tracing as well as providing other helper functions for calculating ray intersections between objects in the scene.
template <int width, int height>
class render_kernel {
 public:
  render_kernel(sycl::accessor<vec3, 1, sycl::access::mode::write, sycl::access::target::global_buffer> frame_ptr) {
    /* initialize accessors */
  }

  void operator()(nd_item<2> item) {
    // get our Ids
    const auto x_coord = item.get_global_id(0);
    const auto y_coord = item.get_global_id(1);
    // map the 2D indices to a single linear, 1D index
    const auto pixel_index = y_coord * width + x_coord;

    vec3 final_color;

    /* kernel logic - raytracing algorithm */

    final_color = color();

    // write final color to the frame buffer global memory
    m_frame_ptr[pixel_index] = final_color;
  }

 private:
  /* member functions */

  vec3 color(ray) {
    vec3 result;
    result = <<< ray-tracing computation >>>;
    return result;
  }

  /* accessor objects */
  sycl::accessor<vec3, 1, sycl::access::mode::write, sycl::access::target::global_buffer> m_frame_ptr;
};
We can construct and use the render_kernel function inside the command group and pass it to parallel_for for execution.
Application Entry Point
The program's main() is where we set up everything we need on the host and invoke the ray-tracer.
int main() {
  // frame buffer dimensions
  constexpr auto width = 1200;
  constexpr auto height = 800;
  constexpr auto num_pixels = width * height;

  // select the SYCL accelerator (i.e Intel GPU for this machine)
  auto queue = sycl::queue(sycl::gpu_selector{});

  // allocate the frame buffer on the Host
  std::vector<vec3> fb(num_pixels); // frame buffer

  // run the SYCL render kenel
  render<width, height>(queue, fb.data());

  // save the pixel data as an image file
  save_image<width, height>(fb.data());

  return 0;
}
This function generates a .ppm image file that can be read, for example, by GIMP or converted to .jpg, .png and other image file formats so that the output can be easily viewed.
Saving the image output
template <int width, int height>
void save_image(vec3* fb_data) {
  std::cout << "P3\n" << width << " " << height << "\n255\n";
  for (int y = height - 1; y >= 0; y--) {
    for (int x = 0; x < width; x++) {
      auto pixel_index = y * width + x;
      int r = static_cast<int>(255.99 * fb_data[pixel_index].r);
      int g = static_cast<int>(255.99 * fb_data[pixel_index].g);
      int b = static_cast<int>(255.99 * fb_data[pixel_index].b);
      std::cout << r << " " << g << " " << b << "\n";
    }
  }
}
Also, although we will be doing single-precision floating computations, we can also template the vec3 class from the original code of the application. This means that it could work with either single-precision (floats) or double-precision (doubles).
For the purpose of making this article easier to follow, I will avoid making the class templates too convoluted and define a real type alias as float.
using real_t = float;With that being set, we are now one vec3 class away from implementing our first version of the render_kernel and outputting its result in an image.
Write the pixel data using a custom vec3
In computer graphics, colors and positions are represented as triples of floats. This type of format is defined using the vec3 data structure which is used in our application for all the linear algebra that is required. The only change done to the original class vec3 is that we added a nicer representation of the underlying data that allows us to access the elements of the array as either x, y, z or r, g, b by using union.
class vec3 {
 public:
  union {
    real_t data[3];
    struct {
      real_t x, y, z;
    };
    struct {
      real_t r, g, b;
    };
  };

  /* Constructor(s) */
  [...]

  /* Methods */
  [...]
};
In addition to that, if you are using ComputeCpp with C++14, to offload some computations to compile-time you can define the vector math functions that don't modify the underlying data members of the class as constexpr. Some other SYCL implementations may not have language support beyond C++11 for features such as the constexpr improvements that were introduced, for these the function declarations can remain as they are in the original source.
Now we are ready to use vec3 and design a simple application that yields an image as an output, which will serve as the base for the more interesting ray-tracing bit. Bear with me for now, ray-tracing is coming but building it up step-by-step is important as it allows me to gradually introduce the design and what changes need to occur as we build up the complexity.
As I already mentioned, we will abstract the tracing in the color member function of the render kernel. It is quite simple for now as it only takes x and y or red and green values that are computed inside the SYCL kernel and returns the color per pixel.
vec3 color(real_t u, real_t v) {
  return vec3(u, v, 0.2);
}
And then we can call the function from within the kernel body where, apart from this minor change, everything else remains the same.
void operator()(nd_item<2--> item) {
  [...]

  vec3 final_color;

  real_t u = static_cast<real_t>(x_coord) / width;
  real_t v = static_cast<real_t>(y_coord) / height;

  final_color = color(u, v);

  [...]
}
The result of this kernel will be the RGB gradient values which are stored in the frame accessor object and later automatically copied over to the host frame buffer memory. Memory cleanup on the SYCL device is automatically done on exit of the command group scope, following the C++ RAII programming idiom.
With this we have almost set the ground for adding our tracing functionality. There is one modification that needs to be done in the vec3 class. If you are following this by typing along on your machine, and tried to execute the this kernel, you will see that the ComputeCpp device compiler will output the following warning:
warning: [Computecpp:CC0034]: Function sqrtf is undefined but referenced on the device and the associated kernels may fail to build or execute at run time [-Wsycl-undef-func]]Therefore, we either need to create our own square root function or use the SYCL built-in math functions that can be used in both host and device code.
For the case of square root, we will use cl::sycl::sqrt.
Now that the vec3 class is setup and the simple gradient color rendering kernel are taken care of, we can run the application and get the following output:

Sphere tracing
Host Application
So now we can use the same concept introduced above to trace spheres by defining a sphere class which encapsulates the properties of a sphere as well as the hit routine that is called from the SYCL device.
class sphere {
 public:
  sphere() = default;
  sphere(const vec3& cen, real_t r) : center(cen), radius(r) {}

  bool hit(const ray& r, real_t min, real_t max, hit_record& rec) const {
    vec3 oc = r.origin() - center;
    auto a = dot(r.direction(), r.direction());
    auto b = dot(oc, r.direction());
    auto c = dot(oc, oc) - radius * radius;
    auto discriminant = b * b - a * c;
    if (discriminant --> 0) {
      auto temp = (-b - sycl::sqrt(discriminant)) / a;
      if (temp < max && temp > min) {
        rec.t = temp;
        rec.p = r.point_at_parameter(rec.t);
        rec.normal = (rec.p - center) / radius;
        return true;
      }
      temp = (-b + sycl::sqrt(discriminant)) / a;
      if (temp < max && temp > min) {
        rec.t = temp;
        rec.p = r.point_at_parameter(rec.t);
        rec.normal = (rec.p - center) / radius;
        return true;
      }
    }
    return false;
  }

  // geometry properties
  vec3 center;
  real_t radius;
}
The definition of the sphere class mostly follows that of the book and has no SYCL specific code apart from the use of the built-in sycl::sqrt function.
So now we have to make a hit_world function that will call the hit routine for each sphere object on the device. In order to do that, we define a
hit_record struct that holds the point of intersection, the distance and the surface normal. The definition is exactly the same as in the book and will make checking for all intersections between objects in a scene slightly easier to implement.
struct hit_record {
  float t;
  vec3 p;
  vec3 normal;
};
Another approach would have been to keep an Id of each sphere and return that on hit instead of keeping the intersection data in a separate struct but the struct is small enough and is what the author uses for the reference C++ ray-tracing code.
Render kernel
Now we can define the hit_world function as well as the rest of the changes that need to be made to the render_kernel class.
template <int width, int height, num_spheres>
class render_kernel {
 public:
  [...]

  void operator()(sycl::nd_item<2> item) {
    [...]
  }

 private:
  bool hit_world(const ray& r, real_t min, real_t max, hit_record& rec, sphere* spheres) {
    auto temp_rec = hit_record{};
    auto hit_anything = false;
    auto closest_so_far = max;
    for (auto i = 0; i < num_spheres; i++) {
      if (spheres[i].hit(r, min, closest_so_far, temp_rec)) {
        hit_anything = true;
        closest_so_far = temp_rec.t;
        rec = temp_rec;
      }
    }
    return hit_anything;
  }

  vec3 color(const ray& r, sphere* spheres) {
    hit_record rec;
    if (hit_world(r, real_t{0.001}, real_max, rec, spheres)) {
      return 0.5 * vec3(rec.normal.x() + 1.0, rec.normal.y() + 1.0,
      rec.normal.z() + 1.0);
    }
    vec3 unit_direction = unit_vector(r.direction());
    float hit_pt = 0.5 * (unit_direction.y() + 1.0);
    return (1.0 - hit_pt) * vec3(1.0, 1.0, 1.0) + hit_pt * vec3(0.5, 0.7, 1.0);
  }
};
The render_kernel function call operator overload requires passing a pointer to the spheres object and we will have to use the cl::sycl::accessor::get_pointer function to retrieve the raw pointer type and from the global memory device accessor.
void operator()(sycl::nd_item<2> item) {
  [...]

  auto r = get_ray(u, v);
  final_color = color(r, m_spheres_ptr.get_pointer());

  m_frame_ptr[pixel_index] = final_color;
}
Currently we represent our array of geometries as a vector of sphere objects. The spheres accessor handles the memory access for all spheres on the device and its access target is the global memory address space. Thus, in our render kernel body we pass the spheres argument to the color member function as a raw pointer. In order to pass the spheres accessor argument we need to get the underlying pointer in the correct memory address. This is achieved by using a function of the SYCL accessor class that returns the data pointer in the memory address space used by the accessor. This function is called get_pointer() which we have already used in the above implementation of the render kernel by accessing the spheres pointer in global memory via the accessor as follows: m_spheres_ptr.get_pointer().
But SYCL also provides the ability to explicitly target the memory address you that will be used for our device pointers through an interface of the class multi_ptr.
The multi_ptr class in SYCL is used for typing purposes. It provides a syntax to wrap pointers in classes by adapting them to the correct address space. For example, it is possible to access the address of a data member which is defined as a raw pointer within a struct via an accessor by explicitly specifying its address space in device memory with the use of the multi_ptr class.
Using SYCL pointer aliases to explicitly target device-side memory region
In the following example I am trying to instantiate a data_struct object with a pointer to the global memory.
struct data_struct {
  int* p;
  [...]
};

sycl_accessor glob_acc;
[...]
parallel_for([=](...) {
  data_struct ds = (&glob_acc[0]);
});
However, what I have written is invalid because we don't know the address space of member pointer (int* p) inside the struct. In SYCL the host and device memory addresses are are separate and we cannot have an implicit translation from one to the other.
SYCL defines the following memory regions for access on the device side.
enum class address_space : int {
  global_space,
  local_space,
  constant_space,
  private_space
};
So by defining the pointer to int in our structure as multi_ptr<int, access::address_space::global_space> we are able to access it on the device inside the parallel_for construct in the global memory address space. Furthermore, SYCL provides template specialization aliases for different pointer address spaces.
We can re-write the struct using an alias type to target global address space.
struct data_struct {
  global_ptr<int> p; // pointer to int in global address space
  [...]
};
Modifying the render kernel to use SYCL pointer aliases
The described approach can also be done for the rest of the address spaces, intuitively, following the naming used in the address_space enum class, so constant_ptr for constant space, local_ptr for local space and private_ptr for private space.
In order to adapt our member functions in the class render_kernel functor - color and hit_world, we have to change the parameter type for spheres from spheres* to their corresponding multi_ptr alias type. Our spheres are defined in global address space, thus we will be using global_ptr.
bool hit_world(const ray& r, real_t min, real_t max, hit_record& rec,
    const sycl::global_ptr<sphere>& spheres) {
  return [...]
}

vec3 color(const ray& r, const sycl::global_ptr<sphere>& spheres) {
  return [...]
}
And within the render kernel body we pass the accessor as it is without the need to use get_pointer().
void operator()(sycl::nd_item<2--> item) {
  [...]

  auto r = get_ray(u, v);
  final_color = color(r, m_spheres_ptr);

  [...]
  m_frame_ptr[pixel_index] = final_color;
}
This approach is not of crucial necessity to this project, however it provides better readability and consistency through explicit typing for our member functions that require passing pointers to the device memory we are accessing.
As a result, we no longer need to use get_pointer() to pass a device pointer in the helper functions defined in render_kernel class in order to get access to the pointer to sphere in device memory address space.
Calling the render kernel
In order to call the updated kernel functor from the render function we need to make some changes, such as updating the device buffers definitions and instantiating the render_kernel functor with the new spheres accessor.
template <int width, int height, num_spheres>
void render(vec3* fb_data, const sphere* spheres, output_format out_fmt) {
  [...]

  sycl::buffer<sphere, 1=""> spheres_buf(spheres, sycl::range<1>(num_spheres));

  queue.submit([&](sycl::handler& cgh) {
    [...]

    auto render_kernel_func = kernels::render_kernel<width, height, num_spheres>(frame_ptr, spheres_ptr);
    cgh.parallel_for(sycl::nd_range<2>(global, local), render_kernel_func);
  });
}
Finally, we set up the spheres on the host in main().
constexpr auto num_spheres = 2;
std::vector<sphere> spheres(num_spheres);
spheres.push_back(sphere(vec3(0.0, 0.0, -1.0), 0.5)); // (small) center sphere
spheres.push_back(sphere(vec3(0.0, -100.5, -1.0), 100.0)); // (large) ground sphere
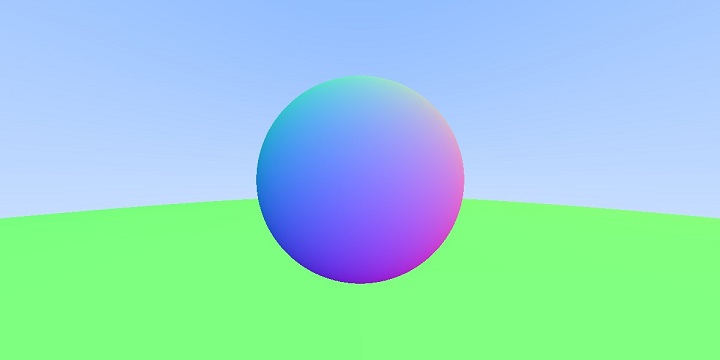
render<width, height, num_spheres>(fb.data(), spheres.data());
The final result should be two traced spheres, one of which is used as floor or ground in the scene and the other one is centered on the ground.
Now everything looks fine but we have modified the application so that doesn't behave in a polymorphic way, like the implementation in the book. The reason is that we are currently working with a concrete class sphere. We will get back to this part in the next article and explain the possible techniques of working around that since dynamic polymorphism is not possible in SYCL, this limitation is inherited from OpenCL. Before we get there, we have other problems to tackle such as random number generation on the device-side of the application so we can achieve anti-aliasing by averaging a bunch of random samples inside each pixel.
If you've found this interesting, there is a second part of this article where we examine pixel sampling and material tracing. Follow us on Twitter to be the first to find out about new blog posts.